Pages

Friday, November 29, 2013

An Easier Black Friday

I personally choose to have my shopping experience be something that is relaxing and laid back. I like to really take my time to find what I want. Based on that I'm not one that will stand in line for hours at a store and fight the crowd to get the Black Friday deals. Sure, I think the 70%-90% off deals are amazing, but I just can't get myself to deal with the crowds and insanity. For that reason I choose to do my Black Friday shopping online. 

This year I have found two new amazing sights offering up some truly great Black Friday deals you can get all from the comfort of your home. They are Pick Your Plum and GroopDealz


Both sites offer up items that you typically find in the local boutiques around the squares in your hometown, yet at half the price. I was overjoyed when I stumbled upon both these sites.

Here are a few of the items I'm thinking about picking:
Note Sets for under $1
Holiday Washi Tape for up to 80% off
Iconic Style - Wool Hats for 73% off
Knit Arm Warmers for under $2

Here are a few of the dealz I want to grab up:

Diamonds in the Rough Necklace
Holiday Lace Dress


Lace Trim Knitted Leg Warmers
Tiny Gold Initial Heart Necklace


Now I'm on the hunt for some more super deals on this Black Friday. I just adore a great deal!


<3 Kelly Jean


Sunday, November 24, 2013

Margherita Spaghetti Squash

Sometimes it's hard to find substantial meals for dinner that are healthy and vegetarian. This Margherita Spaghetti Squash was the perfect solution. It's even Gluten Free! It was mouthwateringly delicious! My fiancé even approved and asked for me to make it again this next week. The whole thing took about 50 minutes and was the perfect amount to feed both my fiancé and me. 


The recipe was extremely easy to make. The only slightly hard part was cutting the spaghetti squash in half. I always struggle greatly getting it cut. I usually end up banging and pressing a little too hard on my squash with a dull knife. I recently got an amazing new knife set from Joseph Joseph. This made the job so much easier. The squash was cut in a jiffy. 


Here's how I made this amazing and healthy dinner....

Ingredients:
  • 1 Large Spaghetti Squash
  • 2 Tablespoons Olive Oil
  • 5 medium Campari Tomatoes (you can also use 1 Large Roma Tomato)
  • 2 Tablespoons of Basil (fresh of dried)
  • 1/4 cup Shredded Mozzarella Cheese
  • 1 Teaspoon Salt
  • 1 Teaspoon Pepper
  • 1 Teaspoon Garlic Powder
Directions:
  1. Preheat the oven to 400 degrees Fahrenheit.
  2. Slice the spaghetti squash in half lengthwise down the middle. 
  3. Remove the seeds and center strings.
  4. Drizzle the two halves with olive oil and then sprinkle with salt, pepper and garlic powder. 
  5. Place the squash, open side down on a cookie sheet and bake for 30 minutes.  
  6. Remove from the oven, check to see if the squash is soft and easily comes up with a fork into a spaghetti like texture.  If it's too hard to remove, cook for another 10 minutes.   
  7. Remove from the oven, scrape and fluff the stringy squash with a fork.  Leave the squash in the skin.
  8. Turn the oven up to broil. 
  9. Add the tomatoes and fresh basil into the squash, stir and top with the mozzarella cheese.  
  10. Place in the broiler for 3-4 minutes, until the cheese is melted and slightly browned. 
  11. Allow to cool for 5 minutes before serving the squash.
  12. ENJOY!


This recipe was adapted from Hoopfinity's Happenings and Easy Recipes To Do


<3 Kelly Jean


Monday, November 11, 2013

GoStak Portable Snack Holder

The perfect portable snack holder!


I typically have a small lunch around 10:30-11:00 during the week due to my work schedule. It never fails that 2 o'clock rolls around and I'm hungry again. I don't get home till usually 5:00pm or later so I have to have something to fulfill my needs. Well, thanks to my amazing fiancé I now have a new way to way to bring along some nutritious snacks to curb my mid-day hunger pains. These Blender Bottle GoStak jars are amazing. They are extremely convenient and easy to use. The separate compartments twist apart to allow you to switch up your snacks. You can twist as many jars as you want together to allow you to bring all the necessities or just bring a few. I love them because they easily fit in my purse without me having to cart along a lunchbox also.

Apple Cinnamon Chobani with Granola and Flax Seed

The other morning my GoStak container came in handy when I was running late and didn't get to eat breakfast at home. I poured some of my granola in one jar and flax seed in the other. This allowed me to have a quick breakfast at my desk. I'm thinking about using them to bring along my own salad dressing for my lunch. I'm really picky about my dressings and I can't seem to find one I really like at Panera for my classic salad as part of the YouPickTwo.

You can pick some of these GoStaks up on Amazon, the Blender Bottle siteVitamin World, or even your local Walmart.


<3 Kelly Jean


Friday, November 8, 2013

Love is Sweet Bridal Shower


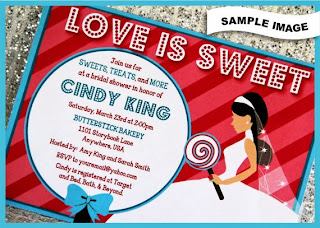
I recently hosted a bridal shower for my best friend. We hosted it at her soon-to-be in-laws family church. The theme was Love is Sweet and the colors were purple and silver. I ordered my invitations from Storybook Lane Crafts etsy shop. The original was super cute, but I had to have Kelli customize the invitation to match the colors of my theme.

Here's the original:

Here's how my customized invitation turned out:
I had to black out any private information. Sorry if it takes away from the ADORABLE invitation.
I think she did an amazing job. I was so happy with the end result. To go with the theme of the shower I decided to DIY my own favors. This didn't go as well as I planned, but I think that's because it was my first time working with melting wafers and making suckers. It takes a little practice to get the end result to look "perfect". 

Here's the candy wafers I used. They were purple (orchid) and vanilla flavored.

I slowly added more and more wafers to my double boiler to melt the whole bag.

Here are a few tutorials on melting candy in case you have any questions:


I placed cake pop sticks in the molds and then poured the melted chocolate over top.

After freezing them I folded up this cute free printable and added a little eggplant colored bow to make my favors complete.

Here is where you can get the FREE printable for this great favor Love is Sweet Lollipop Cover


<3 Kelly Jean


Thursday, November 7, 2013

Salted Caramel Chocolate Chip Cookie Bars

There are some times in my life when I crave something really sweet. I try to be healthier than I was in the past, but I still have times that I just want some really yummy food. Well this was one of those days. I decided to make for my fiancé and I Salted Caramel Chocolate Chip Cookie Bars. YUM! I found the recipe here at the Blahnik Baker's blog.


Here's your ingredients:
2 1/8 cups all-purpose flour
1/2 teaspoon salt
1/2 teaspoon baking soda
12 tablespoons butter, melted and cooled to room temperature --- Noob Cook has a great tutorial on melting butter in the microwave
1 cup light brown sugar
1/2 cup granulated sugar
1 large egg, room temperature
1 large egg yolk, room temperature
2 teaspoons pure vanilla extract
2 cups chocolate chips
6 ounces caramel candy squares, unwrapped
3 tablespoons heavy cream
Sea salt, for sprinkling over caramel and bars


After obtaining all my ingredients I got to baking!
  1. Preheat oven to 325 degrees F. Line a 8' X 8' baking pan with parchment paper (or foil) leaving overhang. Spray with nonstick cooking spray.
  2. In a large bowl, whisk together the flour, salt, and baking soda.
  3. In the bowl of your stand mixer (or medium bowl), beat the melted butter and sugars together until combined. Add in the egg, egg yolk, and vanilla extract and beat until smooth. Slowly add the dry ingredients and mix on low, just until combined about 1 minute. Then stir in the chocolate chips for additional one minute.
  4. Combine the caramels and heavy cream in a medium microwave safe bowl and melt in a microwave. Stir every 30 seconds until caramels are melted. This will take about 2 minutes, depending on your microwave.
  5. Add half of the cookie dough to the prepared pan. Press gently and smooth the top with a spatula. Drizzle/pour the hot caramel sauce over the cookie dough and sprinkle with sea salt. Using a small cookie scoop or a tablespoon, drop spoonfuls of cookie dough over the caramel. Spread the dough with a spatula until the caramel is covered. Sprinkle again with sea salt. 
  6. Bake for 25-30 minutes or until the top of the bars are light golden brown and the edges start to pull away from the pan. Cool bars on a wire rack to room temperature. Cut bars into squares and serve.


It was scrumptious! My fiancé definitely approved since he'd eaten a good portion of it before I could even take the picture.


<3 Kelly Jean


Wednesday, November 6, 2013

Hot Yoga Sweating Experience


I found an article recently on the 7 Pros and Cons of Hot Yoga that you should know
Here they are: 


  1. PRO: It detoxes your skin when you sweat to release impurities
  2. CON: It can cause dehydration since you are sweating so much
  3. PRO: The high temperatures and humidity allow you to be more flexible than you normally are
  4. CON: Dizziness is common due to the high temperatures
  5. PRO: The hot air opens up your airways and allows you to breathe easier
  6. CON: It's a full 90 minutes of the high heat intense yoga session
  7. PRO: You feel rejuvenated after

I had been interested in hot yoga for quite awhile. I love the typical yoga classes I find at my local LA Fitness, but was I ready for hot yoga? I was nervous about the extreme heat in the classrooms. I seem to be very sensitive to high temperatures so I was really worried about passing out. A friend of mine kept recommending the classes at her Yoga Studio (Ember Yoga), so I weighed the pros & cons and decided to give it a try.


I started out simple with a Hot Vinyasa class that was heated to 95 degrees with 40% humidity. I was sweating as soon as I laid out my mat and sat down. It was pretty hot! I have to say though that I really didn't get to a point in the class where I felt dizzy. Everything went great. I actually feel like I did a better job in this hot yoga than I normally do in my regular yoga classes at LA Fitness. I will admit though that I struggled a little when I tried the Hot Sequence class that's heated to 105 degrees with 40% humidity. That 10 degree difference in temperature really had an effect on me.


My favorite part of the class overall though was the last 5 minutes of cool down when they come around with a cool wash cloth scented with lavender. That was heavenly! After that experience I now want to go out and purchase lavender essential oils to give my apartment that "spa-like smell". I also enjoyed their little boutique where you can shop around for yoga essentials.


Here are my recommendations for anyone trying out hot yoga for the first time:


  • Hydrate yourself before going to the class, hydrate during the class, and hydrate afterwards....Just HYDRATE!

  • Bring a very large towel if you don't already have a mat towel.

  • Wear as little clothes as you feel comfortable in. Whatever clothing you do wear make sure it's moisture wicking. Fabletics and Lululemon have some great yoga clothes.
  • Take your time. If you are not ready for a pose, don't force it.
  • Take breaks if you feel dizzy. You can always move back into child's pose if you need a moment to take a breath.
If you get the chance I'd highly recommend trying a hot yoga. Ember Yoga is definitely worth it if you are in the area.


<3 Kelly Jean


Monday, November 4, 2013

Pumpkin Spice Chai Latte

I have been obsessed with pumpkin everything lately. I have even made an entire Pinterest board dedicated to it called Pumpkin Possibilities. It is full of all kinds of pumpkin recipes, including cakes, pies, cookies, coffees, spreads, pancakes, and much much more. Well along with my pumpkin pinteresting I have also been scouring my local stores for anything pumpkin. I kept seeing the pumpkin spice chai latte mix tempting me every time I went to the store. I finally gave in and purchased it.


I think I was a little too overexcited about this purchase. As soon as I got home I made myself a large cup of it....maybe a little too large of a cup. I mixed 1 cup of the pumpkin spice chai latte with 1 cup of unsweetened almond milk, then threw it in a Starbucks cup with a handful of ice. To top it all off I sprinkled a tad bit of pumpkin pie spice on top. Oh my gosh it was so good. It was the perfect drink to complement my day of relaxation enjoying the outdoors.


I think next I'll try out these pumpkin cupcakes with maple cream cheese icing and fondant pumpkins. To make it a little easier I'll just switch out the fondant pumpkins for the candy corn pumpkins you can find in clearance sections at grocery stores everywhere right now.


<3 Kelly Jean


Saturday, November 2, 2013

Coffee Bean and Tea Light Candle


I just found the simplest way to make my apartment smell amazing without spending a lot of money on candles and plug ins. It was by far the easiest DIY I've ever done. All I had to do was fill a bowl or small serving platter with coffee beans and add tea lights. All of these products may easily be something that people already have around the house. I was able to get all of my supplies at the Dollar Store and the supplies I got should last me for quite awhile. 

I got:
  • 10 pack of vanilla tea lights
  • 12oz bag of French Vanilla Coffee beans
  • 1 small vase
It's as easy as that and when you burn this your whole house will smell like freshly brewed coffee!! You can switch it up by trying different flavors of coffee. I think next I will get Pumpkin Spice coffee beans to try out due to my pumpkin obsession.


<3 Kelly Jean


Wednesday, October 30, 2013

PB2 Peanut Butter and Banana Shake


I recently learned about this amazing product called PB2. It is a powdered peanut butter that has 85% less fat calories than regular peanut butter. In one serving (2 tablespoons) you have only 45 calories or 1 WW points plus. I feel like this is a great alternative to peanut butter for those of you who are trying to count calories and get healthier. PB2 allows me to give into my cravings for peanut butter, yet still keep my calorie count in check. I normally mix the PB2 powder up to go on my whole wheat toast, but I've been looking for some new ways to use PB2. 

A few nights ago I decided to make a smoothie/shake using my chocolate PB2. It was amazing! I was so happy with the results. For a whole cup full of this delicious shake it only cost me 85 calories! That's pretty impressive when you consider the fact that most smoothies or milkshakes are over 300 calories.


To make this delicious shake all I needed was: 
  • 2 tablespoons of PB2
  • 1 Large Banana
  • 1 cup of Almond Milk (unsweetened)
  • 1 handful of ice cubes
Then blend it all together in the blender until creamy and ENJOY!


If you aren't into smoothies then the Bell Plantation website has some other ideas to mix PB2 into your lifestyle. 


<3 Kelly Jean


Sunday, October 27, 2013

Copycat Baked Brie Delight Recipe

Another Broken Egg Cafe - Destin, Florida

During the summer my fiancé and I went to Destin, Florida with his sister and her family. This was a much needed vacation for all of us. It was amazing. I love the beach. If I could I would absolutely move to the beach. I imagine it is wonderful waking up everyday to the sound of the waves crashing on the beach.

While there we went to so many amazing restaurants. One of our favorites was a breakfast/brunch restaurant called Another Broken Egg. I recently found out that there's actually one in my home state. I will definitely have to visit the Georgia location whenever I get around to the area it's in. By far the best dish on their menu was the Baked Brie Delight


We loved it so much we tried to recreate it when we got home. Here's how we did it....


Ingredients

1/2 Baguette Loaf ---- not pictured here
1/2 Brie Circle (2 quarter sized pieces)
2 tablespoons Brown Sugar
1 Golden Delicious Apple (chopped)
1/4 cup Raisins
1/4 cup Walnut pieces

Steps
  1. Preheat oven to 350 F.
  2. Meanwhile, melt the butter over medium heat. Once the butter is melted, stir in the brown sugar. After the sugar has dissolved into the butter add in the chopped apple, raisins, and walnut pieces. Mix thoroughly. Continue to stir, allowing for caramelizing of the ingredients. 
  3. While caramelizing, slice the baguette into 1/2 inch slices. Place evenly onto a metal non greased pan along with the Brie. Bake 5 minutes until the Brie has begun to melt and the baguette has toasted nicely.
  4. Serve immediately with the caramelized fruit and nut mixture. 
Enjoy!

<3 Kelly Jean


Tuesday, October 22, 2013

FIGO Restaurant Deserves Five Stars


Tonight for dinner my sister and I went to visit an amazing Italian Restaurant called FIGO at their Alpharetta location. At first when I walked in I was in shock! I had so much amazing food to choose from on their menu. My favorite part was that you can completely make your own pasta. Just pick a pasta and pick the sauce.

I went with the Spinach Penne with Primavera sauce that was garnished with just a dash of parmesan. It was a wonderful blend between the spinach penne, the fresh tomatoes, broccoli, green peas, fresh spinach and garlic with extra virgin olive oil, basil and white wine. It was (to point it out in one word) AMAZING! I was full already without having eaten half the plate of pasta. It probably didn't help that I indulged myself earlier in the meal with their delicious bread and olive oil. This was definitely the food for a carb fanatic vegetarian. (which I am)


For a lighter dinner I recommend the Insalata di Spinaci e Caprino. It's not only healthy for you, but it also works for anyone with a Gluten Free Allergy as well.

You should go check them out, FIGO.


<3 Kelly Jean