Pages

Saturday, November 29, 2014

Cranberry-Pecan Pie Cookies


I hope everyone had a great holiday weekend this past week. I spent a lot of it decorating and baking. One of my favorite things to do is bake, especially around the holidays. It's always fun to switch up recipes and make something new out of an old recipe. Recently I found this recipe on Pinterest for Cranberry-Pecan Pie Crust Leaves. The recipe was originally intended for pie crust leaves to be placed on top of an after Thanksgiving Pot Pie. However, I saw the recipe and was inspired to make cookies out of the same things with a few extra ingredients. Therefore, my Cranberry Pecan Pie Cookies were created. 


Ingredients
  • 1 (15-ounce) package refrigerated piecrusts
  • 1/2 cup finely chopped pecans, toasted
  • 1/2 cup finely chopped dried cranberries
  • 1/2 cup brown sugar
  • 1 tsp Cinnamon
  • 1 tsp Nutmeg

Preparation
  • Unfold each piecrust, and press out fold lines. 
  • Sprinkle 1 piecrust with pecans, cranberries, brown sugar, cinnamon, and nutmeg; top with remaining piecrust. 
  • Roll into a 14-inch circle, sealing together piecrusts. 
  • Cut into desired shapes with a 2- to 3-inch cutter. Place pastry shapes on a lightly greased baking sheet. 
  • Reroll any leftover scraps of dough, and repeat the procedure.
  • Bake at 425° for 8 to 10 minutes or until golden.


Friday, November 28, 2014

DIY Tomato Cage Christmas Trees

Now that I have a house it seems like my main obsession is decorating my house. I hate having empty rooms with no character. I want my house to look lived in, but still well organized at the same time. When you have a bare room with no art on the wall, no little cute touches, and not even a specific color on the wall other than the plain color that it was painted by the builders, then it's just a tad bit boring. That is why my main obsession since moving in has been to work on slowly decorating room by room. I get my source of inspiration (like many other people) from Pinterest. Obviously, before I even was in the market for a house I had an entire board dedicated to how my house would be decorated and built. Not unlike the many single people with boards full of baby stuff and wedding inspiration. I mean we all dream of our future, so why not create a Pinterest board for said future? Anyways, now that we are closing in our Christmas I'm searching my boards to decide just how to decorate our new house for our FIRST Christmas as a married couple. My husband and I don't always agree 100% on our vision for the decorations, but we did agree on this front porch.


Source

My husband and I love this front porch! It's whimsical, but still has all the typical colors of Christmas without being too cutsey. Sometimes when I decorate I like to sway from the traditional, but my husband was determined to go green and red for Christmas. Now it was time to search for the supplies to get our front porch to look exactly how we wanted it. I started off by looking for Topiaries for my front porch. I thought about buying trees to place in my front porch planters or buying a full set that comes in the planters. I wasn't finding a ton of options of trees to place in my planters, but I did find plenty of topiaries with planters. However, the ones I was finding were not at a price I was willing to pay. 


Even checking back today with Black Friday deals, there were still many topiaries coming in at more than $50 per tree. That's just not a price that we can easily afford as a young married couple. Therefore, I decided to make my own. I used: 2 X 3-feet tall tomato cages, 4 X 9-feet Unlit Pine Garlands, 2 X boxes of LED C3 Warm White Lights,  twist ties, heavy items (bricks), and my two planters. My total cost for the 2 topiaries was around $38. After gathering all my items I got to work. My husband being the super sweet guy he is helped me out with this project.


After filling the planters with bricks we gathered the random twist ties we have saved over the years and started tying the tomato cages to the bricks. I contemplated taping the tomato cages to the bricks, but with how cold it has been all of my tape would not stick for very long in the cold. I've noticed especially with masking tape that it starts to peel off as soon as you stick it in cold weather. 


After the cage was all tied down we could get to work twisting the garland around the tomato cage. We used a twist tie at the very bottom to attach the initial strand to the tomato cage. 


After finishing twisting all the 18ft of garland onto the tomato cages I went back and twist tied more sections to the tomato cage. I used mostly darker colored twist ties so that it wouldn't be visible while standing in front of it.


Based on how cold it was outside I decided to bring my work inside as I was finishing up winding the garland around and adding the lights. I figured this would also allow me to work on cooking dinner for my husband and I as we worked. Once we had all the garland on all that was left to do was to add the lights and place everything outside. I'm very happy with how it ended up!


We got our lighted gifts from Kirklands when they had a 20% off sale and we found the wreath at Michaels for $19. Now my husband and I are working on decorating our large outside tree and the inside tree. So far we have the lights on the outside tree. Now we just need to find affordable giant ornaments.


I just love decorating for Christmas. I'm curious to see how other people are decorating for the upcoming holidays.


Saturday, November 22, 2014

P90X3 Workout Pictures with Explanations

Even after having a blog for about a year, I'm still learning what I'm doing. Lately I'm working on being more consistent with my posts as well as trying to post as soon as things happen. However, like everyone I'm not always perfect. I just realized that since I've started P90X3 I have not posted any workout pictures. If you follow me on instagram then you'd see I've been posting them there, but now I'm going to overload my blog with all the pictures and explanations/thoughts on the workouts. So enjoy... :) P.S. This will probably be a very long post...


Here we completed CVX. This video is full of some cardio with weights. During the video you repeat each move twice. The top photo on the left is March and Reach aka Stiff Zombie according to Tony Horton. In this move you extend your arms overhead then lower the weight and kick your leg out straight. Reverse. I could really feel this in my shoulders. The bottom photo on the left is Crescent Chair. In the first round you start in Chair position from yoga with the weight at your chest. Then you step back into a lunge/Crescent with your arms overhead holding the weight. Reverse. In the second round of doing this move you keep your arms up the whole time. During the second round my hamstrings/quads and shoulders were BURNING. Also in the above picture you can see that I got in my new Jump Mat. I use this when I workout down stairs to protect my feet so I'm not working out on hard floors.


Here we completed The Warrior. No equipment is required for this video. All you need is your body weight. As Tony Horton mentions in the video, this workout was designed for the military. The bottom picture on the left shows me performing Abrinome. Lie down with your arms at a 45 degree angle from your sides and legs straight up in the air. As Tony tells you, bring your legs to the right, center, and left. Legs should be at a 45 degree angle from the floor or higher. I felt this move a lot in my lower abdomen. The bottom right picture was from the Burnout. The Burnout was depth charges where you explode up into a jump, then slowly release back down into a squat for a FULL MINUTE. It was HARD!


This was from when we completed Isometrix. Isometrix is an isometric workout wher eyou hold positions for an extended amount of time. This workout helped me to focus on strength and balance. The balance aspect was great because that is something I REALLY struggle with. The right picture is Chair with Leg Extended Forward. This was hard for me to hold while standing on my right leg since the right leg had the injured ankle from the sprain. Ever since spraining my ankle, as well as having foot surgery on that foot in high school, I've never had great balance on my right leg. The bottom picture on the right shows Moon Dog. You need to stand on one leg with the other leg off the ground behind you. Lower until your leg and torso are parallel to the ground..or the best you can do. Reach your arms out to your ears and hold. I was stumbling a lot in this move so I couldn't get my body to stay fully parallel.


Here we completed P90X3 Dynamix. A lot of the moves in this video reminded me of Pilates workouts I've done in the past. Dynamix is a dynamic stretching workout designed to help with flexibility, mobility, and strength. This was definitely a test for me on my flexiblity, espeically while doing Fifer Scissors (see picture on top right). I'm hoping eventually I will be able to get my nose to my knee in that move. The move on the top left was Superman - Side Banana. As Tony calls it out you switch from superman on your stomach with your arms and legs off the ground to Side Banana on your side with hips stacked and your legs/arms lifted so only your hips touch the ground. I was feeling it in my abs on this move for sure.


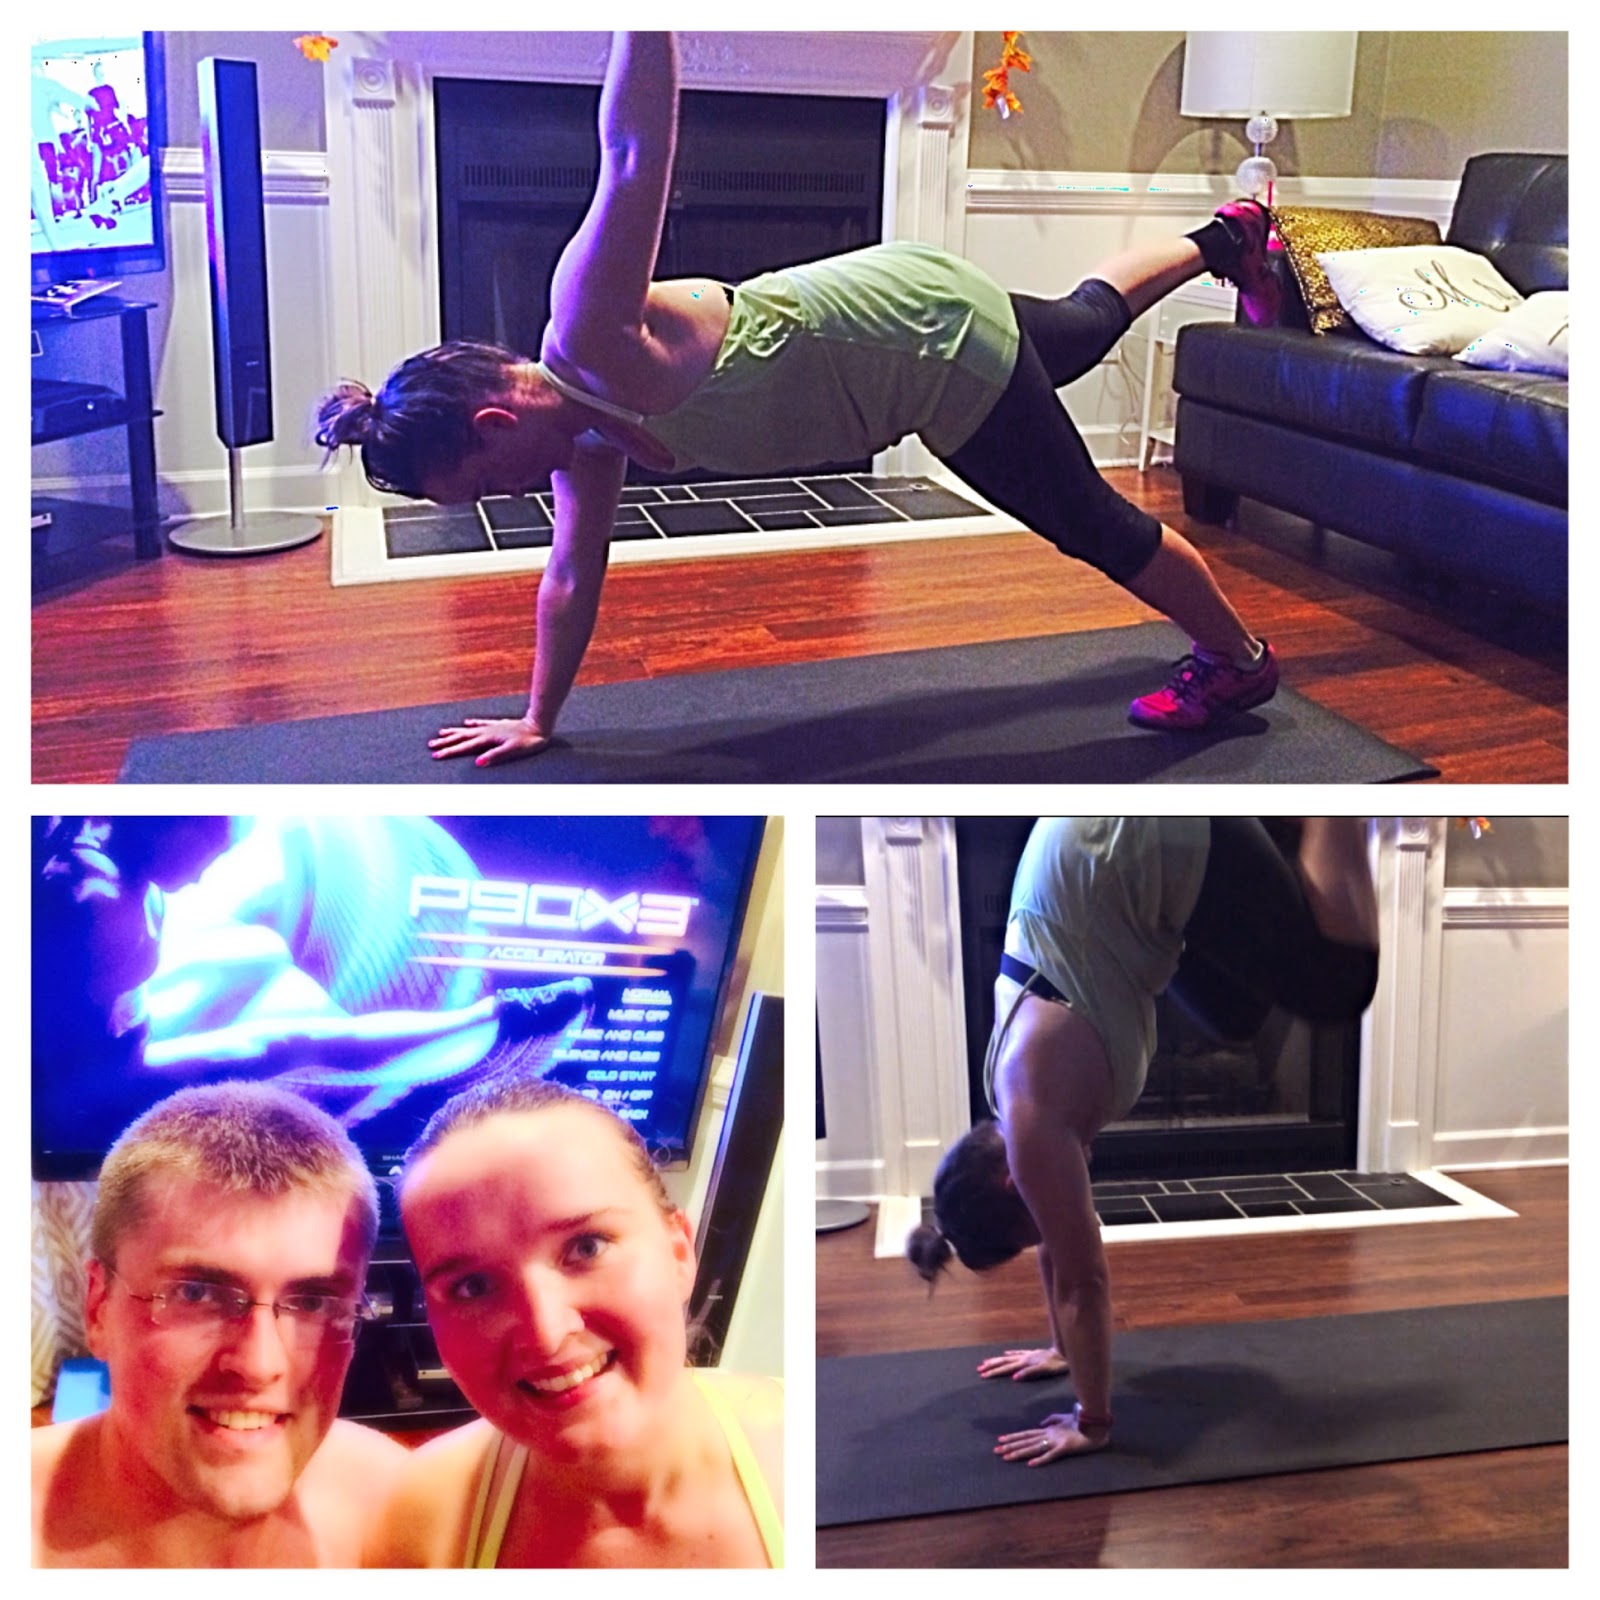
This was from when we completed Accelerator. During accelerator each move was 1 minute and Tony would have you slow down or speed up. Accelerator is an amazing cardio strength workout. The top picture shows me performing Swimmer's Planks. It was really hard for me in this move to attempt to keep my butt down. My body kept trying to go up into downward dog when I lifted my leg and opposite arm. In this move you alternately lift an opposite arm and leg. While your arm is lifted you perform a forward or backward stroke motion...aka the reason for the name. On the bottom right I am completing Donkey Kicks. These are killers! You start with your hands on the floor and your feet tucked in a crouch position. You then kick both feet into the air as high as you can into a V. Then you lower one foot to the ground and cross the other in front of it, kicking to the side with the same hand as the supporting leg in the air. Then switch sides after your next kick. This move is HARD!! At first it's hard to get the coordination down. Once you do you can work on how high you can kick your legs.


Here we completed Triometrics. In Triometrics each move has 3 levels. Mainly during the workout I noticed that as the levels got higher you went lower/deeper in your squats. The picture on the top shows me in Warrior 3 Squats. You start in Warrior 3 standing on one leg with the other leg extended behind you making your body parallel to the floor. Bend the standing leg into a squat then straighten. For Level 1 you arms are to the side, Level 2 your arms are in airplane, Level 3 they are to the front and reaching. This again as a balance move was really hard for me on my right side. I stumbled a few times and had to get back into position. Overall this was a pretty good workout. By the end our legs were so tired we laid on my BeachBody Jump Mat for a little corpse pose/Shavasana to relax.


Here we completed Incinerator. My arms felt like Jello after this workout. I thought this would be more of a cardio workout, but it seemed to be focused a lot on strength. During my second week I upped my weights where I could and burned over 200 calories, compared to the first week at 150 calories. In the top picture on the left I was completing a regular push up with Tony Horton Power Stands. I've just now recently been able to start doing regular push-ups compared to modified push-ups on my knees. I like using the Tony Horton Power Stands because they help a lot to minimize the pain in my wrists during push ups. The middle picture on the left I'm doing a Pike Press. I used the Tony Horton Power Stands again to help my wrists. In this move you are in a "pike-up" position, which is similar to downward dog, and you are doing shoulder presses. In downward dog bend your elbows to reach your head between your hands and almost touch the floor then push back up. Finally, on the bottom left I am completing an "A" press. Lying on your back extend your arms straight up with palms facing each other at chest level. Bend your arms and bring them down so triceps are on either side of your body. This move is really similar to a chest press.


Let me know if you have any questions about P90X3! I'd be happy to answer questions or give encouragement to anyone thinking about starting a new workout program. Beachbody has MANY great programs that I love!!!


Sunday, November 16, 2014

Pumpkin Pancakes

Source

Like many other people I am absolutely obsessed with anything pumpkin. I love pumpkin spice chai tea lattes, pumpkin pies, pumpkin spice candles, Pumpkin Spice Shakeology, and recently pumpkin pancakes. I always like experimenting with my pancake flavors on the weekends, so why not pumpkin? Thankfully I also found a recipe to make healthy pumpkin pancakes. It took only about 15 minutes to make these pancakes (including prep time) so they are also a super easy breakfast. Plus I already had all the ingredients sitting around in my house since I've stocked up on pumpkin puree and spice to make my Pumpkin Spice Shakeology. YUM! My husband was out this morning so I made the recipe for just myself. You can always double the recipe for two people or triple if you have a kid. I ended up with 4 pancakes when I made the recipe below.


Ingredients
  • ½ cup oatmeal
  • 6 egg whites
  • 1/4 cup pumpkin pure 
  • 2 tsp baking powder
  • ½ tsp pumpkin spice
  • a splash of vanilla extract
Instructions
  1. Grind the oatmeal first by using a coffee grinder, magic bullet or a blender (I used my ninja blender)
  2. Add the rest of the ingredients and blend again.
  3. Set a non stick pan to medium heat and spray with cooking spray.

  1. Cook each side for about a minute.
  2. Depending on the size of your pan it could make from 3 large pancakes to 5 smaller ones like mine.

For the 4 pancakes it was only 276 calories, 3 grams of fat, and 30 grams of protein. That to me sounds like a great breakfast to start the day....especially with this cold weather we are having right now in Fall. ENJOY!


<3 Kelly Jean


Tuesday, November 11, 2014

P90X3 Block 1 Complete

Source


I'm a little late posting this due to unforeseen circumstances this last week, but my husband and I have officially finished Block 1 of P90X3. Overall, I have to say it was pretty easy to stick to the program just because it's only 30 minute videos. That doesn't mean they were easy videos in anyway, but they are more manageable to fit into busy schedules just because of how short they are. The only issue I had during Block 1 was caused by me wearing incorrect shoes. My ankle swelled so much from the sprain that you couldn't even see the bone anymore. Due to how bad the sprain was I had to take a few days off working out and use crutches to get around. That alone coupled with the pain of spraining my ankle taught me the lesson of the importance of WEARING THE RIGHT SHOES. Tony Horton says in every video not to wear running shoes and now I definitely do not.


Eventually my ankle did heal and I was able to walk again. I'm still not 100% back to normal and I still wear an ankle brace, but it's doing much better. If needed I will modify my workouts to account for the issues with my ankle. My husband told me that it took him 6 months for his ankle to fully go back to normal size. 

But now that I have finished Block 1 my husband and I took the Progress pictures that are required and weighed ourselves. I am down 10 lbs from when we first started P90X3 and here are my before pictures next to my progress pictures.


SIDE VIEW


FRONT VIEW


Looking at the pictures I can definitely tell the difference that a month of working out and eating healthier has made. If this is only one month of doing P90X3 then I can't wait to see what I look like after doing 3 months of P90X3

As a side note....I started drinking Shakeology during my last week of Block 1 and will continue drinking it throughout the whole process. You always hear that abs are made in the kitchen and I believe it to be true. That is why I will be supplementing Shakeology in to make breakfast my healthiest meal of the day.


<3 Kelly Jean


Shakeology Review


Well, I've now been drinking Shakeology for almost two weeks and I love it. I went with the Vanilla Shakeology to start out with a pretty basic flavor. I figured I'd start out there and try a lot of different recipes with it, then go from there experimenting the other tastes. So far I've tried the Iced Mocha, Peaches and CreamNeapolitan Strawberry, Pumpkin Spice, Strawberry Banana, and Pina Colada. [I linked the flavors to the recipe site so that you can see calorie count if you're curious].


To make the Pina Colada Shakeology I mixed in my Ninja blender 1 scoop of Vanilla Shakeology, 1/2 cup of Skim Milk, 1/2 cup of Pineapple Chunks, 1/2 tsp of Coconut flakes, and 1 handful of ice. It was delicious. It tasted exactly like a Pina Colada just with half the calories and no alcohol. It worked great to start my morning off right as I went out to run errands.


For my Neapolitan Shakeology I mixed in my Ninja blender 1 scoop of Vanilla Shakeology, 1/2 cup of Skim Milk, 1/2 cup of Frozen Strawberries, 1 tsp of Cocoa Powder. This was another hit in my book. I have really contemplated making some extra and freezing it for an after dinner treat of Shakeology Neapolitan Ice Cream. Yum!


On Halloween morning before I headed off to work I made a Pumpkin Spice Shakeology. This was probably the main reason I went with Vanilla Shakeology first was so that I could try the Pumpkin Spice flavor. Ever since Fall started here in Georgia I've been obsessed with trying everything Pumpkin Spice that I can. Therefore, why not make a Shakeology breakfast shake with the Pumpkin Spice flavor? To make this amazing drink I mixed in my Ninja blender 1 scoop of Vanilla Shakeology, 1/2 cup of Skim Milk, 1/2 cup of canned Pumpkin Puree, 1 tsp of Pumpkin Pie Spice, 1 tsp of Cinnamon, and 1 handful of ice. It was delicious! I won't say it tasted exactly like a Pumpkin Spice Frappucino, but it was pretty close and it has way less calories.


Another favorite of mine with Shakeology is any fruity flavored shake. I've been switching out my fruits I throw in. Some mornings I had peaches, some mornings orange slices, and some mornings I go the route of strawberry banana. My favorite yogurt flavor is strawberry banana so I made a shake that tasted exactly the same. This one was pretty simple to make as well. I mixed in my Ninja blender 1 scoop of Vanilla Shakeology, 1/2 cup of Frozen Strawberries, 1/2 cup of Skim Milk, and 1/2 a banana. It was yummy!

I'm pretty sure so far the only flavor I haven't liked is the Iced Mocha. I'm not sure if it's my iced coffee I'm adding in, but it turns out pretty bland. I've been using the Starbucks unsweetened Iced Coffee you can buy in the dairy section and it's just not giving it the right taste that I'm looking for. I only go for this drink on mornings when I'm really tired and dragging and need the extra pick me up from coffee.


I recommend Shakeology to anyone that has trouble eating their recommended daily dose of fruits and vegetables. Apparently you are supposed to have 5-9 servings of fruits and vegetables a day. Do you get that? Do you even like vegetables? If you answered no to either of those you should try Shakeology. This last week I lost my mother-in-law suddenly and tragically. During that week while dealing with the loss and doing everything we can to help out my father-in-law, my husband and I just didn't have the time to workout. We barely had the time to sleep, let alone fit in working out since we were getting home by 10pm or later and still had to be up early the next day. However, during the week I never stopped drinking Shakeology. I had it every single morning for my breakfast. You know what happened after a week of not working out and still drinking Shakeology? I lost around 2-3 pounds that week. I've noticed with loss you are provided with LOTS of bad food. I did my best to still control myself and not over-indulge, but I can't say that I didn't allow myself a donut or piece of cake when provided. However, I did make sure that everyday I had my Shakeology. There's no need to miss the healthiest meal of the day, especially when it tastes so good.


<3 Kelly Jean